Wednesday, December 17, 2014

How To Change The Skin Of VLC Media Player?

The best thing about VLC media player is its simple interface. That’s why many people doesn’t like the look of the VLC media player. VLC media player allow you to change the skin, you can choose your desired skin to looks better.

To change the skin of  VLC media player open VLC Media player and follow these simple steps.

1. Open your Browser, go to videolan.org website and download the Skin.


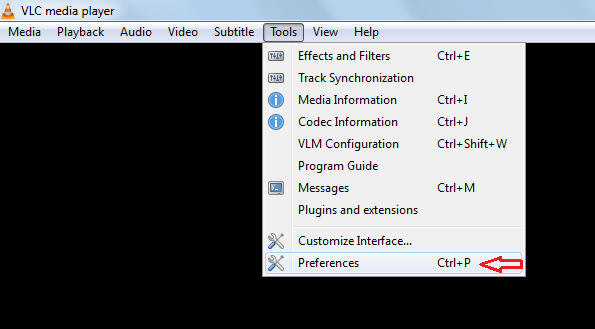
2. Click Tools menu from the menubar of the VLC media player and then choose Preferences to display the simple Preferences window.


3. Click on Interface and under the look and feel menu select Use Custom Skin, choose your desired skin and then click save. 


4. Now Close and Restart VLC media player to see the effect.

5. To get back your old interface, open the preferences window following the same steps and select the use native skin option and save it.
Share:
Read More

Saturday, October 25, 2014

How to Change the Computer Date and Time Using the Command Prompt


On today's computers, the time and date can be easily changed through the control panel clock display. You can also use the command prompt to set the computer's date and time.

To Change the Computer Time and Date Using the Command Prompt, follow these steps:

Changing Date

1. Click the Start button, choose Run, type cmd in the Run text box and then press enter to open the command prompt.


2. Type date in the command prompt window and then press enter. The computer will display the current date setting and invite you to set a new date.

3. Change the date by entering new date in the same format as the date setting you were shown. For example, to change the date to 20 march, 2014, type 03-20-2014 and then Press "Enter".

4. The computer will respond with the new date setting. Press "Enter" to accept the date displayed.

Changing Time

1. Click the Start button, choose Run, type cmd in the Run text box and then press enter to open the command prompt.
2. Type time in the command prompt window and then press enter. The computer will display the current time setting and invite you to set a new time.

3. Change the time by entering new time in the same format as the time setting you were shown. For example, to change the time to 10:00 p.m., type 22:00:00.0 and then Press "Enter".
4. The computer will respond with the new time setting. Press "Enter" to accept the time displayed.
Share:
Read More

Setting Up Screen Saver In Windows 7

Setting a screen saver or animated pictures that appears on your screen when the mouse and keyboard have been inactive for a period of time, prevents from seeing your Desktop. When you move your mouse or press a key on your keyboard, the screen saver turn off and display your Desktop. Windows 7 comes with several screen savers pre-installed. You can also create your own personalized slide show screen saver featuring images in your Pictures folder.

To enable Screen Saver follow the steps:

1. Open the Control Panel, click Appearanceand select Display.

2. Click Change Screen saver from left side of the display window to display Screen Saver Settings dialog box. 


3. The Screen Saver Settings dialog box opens. Choose the screen saver you want to use from the Screen saver drop-down menu.


4. Some screen savers have settings you can change. For example, the 3D Text screen saver enables you to specify what text should be displayed, the font, how the text rotates, and more. To access these settings, select the desired screen saver in the drop-down list and press the Settings button.


5. Use the Wait text field to specify how long your system should be idle before the screen saver starts.


6. If you want Windows 7 to require a password to redisplay the Desktop, click the on resume, display logon screencheckbox to select it.


7. Click the Preview button. Windows 7 displays a preview of the screen saver.

8. Click OK to close the Screen Saver Settings dialog box. Windows 7 will launch the screen saver when next time your system is idle for the specified duration. 

Create a custom screen saver 

You can also create a custom screen saver that cycle through the photos in your Pictures folder. To do so, follow these steps.

1. Open the Control Panel, click Appearanceand select Display.

2. Click Change Screen saver from left side of the display window to display Screen Saver Settings dialog box.

3. In the Screen Saver Settings dialog box, choose Photos from the Screen Saver drop-down menu and click setting.


4. By default, Windows 7 cycles through the photos in your Pictures folder. To use photos in a different folder, press Browse in the Photos Screen Saver Settings dialog box. Then, in the Browse for Folder dialog box that appears, locate and select the folder that contains the images you want to use, and then press OK.

5. The Photos Screen Saver Settings dialog box opens. To change how quickly Windows 7 cycles through your photos, choose a different speed from the Slide show speed drop-down menu.


6. If you want Windows 7 to shuffle the photos in the slide show, click the Shuffle Pictures checkbox to select it.

7. Press Save to close the Photos Screen Saver Settings dialog box and Press OK to close the Screen Saver Settings dialog box.

8. When next time your system is idle for the specified duration, Windows 7 will launch the screen saver. To return to the Desktop, move your mouse or press any key on the keyboard.
Share:
Read More

Tuesday, October 14, 2014

Display Multiple Clock With Different Time Zone In Windows - 7


If you like, you can configure Windows 7 to display as many as two additional clocks. This is handy if you frequently communicate with colleagues, friends, or family members who work or live outside your time zone. To do so, follow these steps.

1. Open the Date and Time dialog box by clicking the date and time in the Taskbar notification area, then clicking the Change date and time settings link.


2. Choose the Additional Clocks tab and then click the Show This Clock checkbox to select it.

3. Choose the desired time zone from the Select Time Zone drop-down menu.


4. Type a display name for both the clock and press OK to close the Date and Time dialog box.
Share:
Read More

Tuesday, September 30, 2014

we are in Tanzinia
we help people to know about technolgy
our contact
Email. acontinuerkizinga@gmail.com
phone number +255 789880287
Share:
Read More

Friday, September 12, 2014

Display Multiple Clock With Different Time Zone In Windows - 7


If you like, you can configure Windows 7 to display as many as two additional clocks. This is handy if you frequently communicate with colleagues, friends, or family members who work or live outside your time zone. To do so, follow these steps.

1. Open the Date and Time dialog box by clicking the date and time in the Taskbar notification area, then clicking the Change date and time settings link.


2. Choose the Additional Clocks tab and then click the Show This Clock checkbox to select it.

3. Choose the desired time zone from the Select Time Zone drop-down menu.


4. Type a display name for both the clock and press OK to close the Date and Time dialog box.
Share:
Read More

Setting Up Screen Saver In Windows 7


Setting a screen saver or animated pictures that appears on your screen when the mouse and keyboard have been inactive for a period of time, prevents from seeing your Desktop. When you move your mouse or press a key on your keyboard, the screen saver turn off and display your Desktop. Windows 7 comes with several screen savers pre-installed. You can also create your own personalized slide show screen saver featuring images in your Pictures folder.

To enable Screen Saver follow the steps:

1. Open the Control Panel, click Appearanceand select Display.

2. Click Change Screen saver from left side of the display window to display Screen Saver Settings dialog box. 


3. The Screen Saver Settings dialog box opens. Choose the screen saver you want to use from the Screen saver drop-down menu.


4. Some screen savers have settings you can change. For example, the 3D Text screen saver enables you to specify what text should be displayed, the font, how the text rotates, and more. To access these settings, select the desired screen saver in the drop-down list and press the Settings button.


5. Use the Wait text field to specify how long your system should be idle before the screen saver starts.


6. If you want Windows 7 to require a password to redisplay the Desktop, click the on resume, display logon screencheckbox to select it.


7. Click the Preview button. Windows 7 displays a preview of the screen saver.

8. Click OK to close the Screen Saver Settings dialog box. Windows 7 will launch the screen saver when next time your system is idle for the specified duration. 

Create a custom screen saver 

You can also create a custom screen saver that cycle through the photos in your Pictures folder. To do so, follow these steps.

1. Open the Control Panel, click Appearanceand select Display.

2. Click Change Screen saver from left side of the display window to display Screen Saver Settings dialog box.

3. In the Screen Saver Settings dialog box, choose Photos from the Screen Saver drop-down menu and click setting.


4. By default, Windows 7 cycles through the photos in your Pictures folder. To use photos in a different folder, press Browse in the Photos Screen Saver Settings dialog box. Then, in the Browse for Folder dialog box that appears, locate and select the folder that contains the images you want to use, and then press OK.

5. The Photos Screen Saver Settings dialog box opens. To change how quickly Windows 7 cycles through your photos, choose a different speed from the Slide show speed drop-down menu.


6. If you want Windows 7 to shuffle the photos in the slide show, click the Shuffle Pictures checkbox to select it.

7. Press Save to close the Photos Screen Saver Settings dialog box and Press OK to close the Screen Saver Settings dialog box.

8. When next time your system is idle for the specified duration, Windows 7 will launch the screen saver. To return to the Desktop, move your mouse or press any key on the keyboard.

Share:
Read More

How To Change Date And Time In Windows- 7?


You may need to adjust your Windows 7 date and time settings, if you are moving to a different region of the world, or have suffered a power loss which can throw off the clock time. Follow the steps to change the Date and Time.

1. Click the date and time display to the right of the notification area on the Taskbar.

2. Windows 7 displays a clock and calendar. Click the Change Date and Time Settings link to open Date and Time dialog box.

3. Click Change Date and Time button to open Date and Time Settings dialog box. 


4. To change the time, click in the Hour field in the digital clock text field, and click the up or down arrow to increase or decrease the value. Repeat this in the Minutes, Seconds, and AM/PM fields. To change Date, select today’s date in the calendar.


5. Press OK to close the Date and Time Settings dialog box.

6. In the Date and Time dialog box, press the Change Time Zone button to open Time Zone Settings dialog box. Choose your time zone from the Time Zone drop-down menu and then press Ok.


Share:
Read More

Five best Free Tools To Recover Deleted files


The five best to recover deleted file from computer, pen drive or from memory card.

1.Recuva

Recuva is a data recovery program for Windows, developed by Piriform. It is able to recover files that have been "permanently" deleted and marked by the operating system as free space. The program can also be used to recover files deleted from USB flash drives, memory cards, or MP3 players. It's very easy to use but has many optional advanced features as well.
The program works on both FAT and NTFS file systems. It is able to recover lost directory structure and automatically renames files when trying to recover two files of the same name.
Recuva will recover deleted files in Windows 7 & 8, 8.1, Vista, XP, Server 2008/2003, and older Windows versions.

2.TestDisk

TestDisk is another excellent free and open source data recovery software. Not only can TestDisk perform basic file recovery like undeleting accidentally deleted files from FAT, NTFS, and ext2 file systems, but it comes with a host of additional functionality.
It is primarily designed to help recover lost data storage partitions and/or make non-booting disks bootable again when these symptoms are caused by faulty software, certain types of viruses or human error (such as accidentally erasing a partition table). TestDisk can be used to collect detailed information about a corrupted drive which can then be sent to a technician for further analysis.

3.Wise Data Recovery

Wise Data Recovery is a free data recovery utility that's really simple to use.There are no menus, no complicated options or dialog boxes: all you do is choose a drive, click Scan, and wait as the program locates any deleted files.
Wise Data Recovery can scan various USB devices like memory cards and other removal devices.

4.Restoration

Restoration is an easy to use and straight forward tool to undelete files that were removed from the recycle bin or directly deleted from within Windows. Upon start, you can scan for all files that may be recovered and also limit the results by entering a search term or extension.
Restoration also provides the option to wipe the found files beyond simple recovery. The program is small and standalone, it does not require installation. Restoration works with FAT and NTFS as well as digital cameras cards.

5.Pandora Recovery

Pandora Recovery is another excellent free file recovery software program. Pandora Recovery Wizard helps you locate and recover lost or deleted files from your system.
A more advanced "Surface Scan" is available in Pandora Recovery that should recover more files than the standard search as long as they are of a popular format.
Pandora Recovery will undelete files from hard drives, memory cards, etc. Nearly anything that stores files that you can also connect to your PC should be supported.
Share:
Read More

How to play Video while downloading in IDM?

Suppose you start downloading a video using IDM and due to some reason, it fails when downloading reaches more than 50%. That feels very bad. But, the bigger reason for disappointment is that it has no resume capability! So, in such conditions, you are left with no other choice other than downloading the file again from the beginning and that’s what IDM advices you too. But do you know that you can even play incomplete downloaded videos in IDM?

1. Open Run from start menu or just press Win+Rand input %appdata%\IDM\DwnlData then press Enter.

2. Now you will see window contain folder named "Your User Account" open it.

3. Now you will see all pending download from "Internet Download Manager". Find your video folder here. 


How to locate which folder contains the incomplete downloaded video?


First of all, you know that it was the most recent thing you’ve downloaded, so the folder must be on top of all.

4. So open the video folder, you’ll find downloaded parts. Now open first file with supported media player like VLC to play your video.
Share:
Read More